Introduction
Introducing Wingstar, the revolutionary cloud-based project management tool that seamlessly brings your team together. Say goodbye to project management headaches and welcome efficiency with Wingstar.
Wingstar isn't just another tool; it's a game-changer. With its powerful features, including multi-user collaboration, real-time dashboards, and automated reporting, Wingstar transforms the way you manage projects. No more juggling multiple platforms or struggling to keep everyone on the same page. Wingstar simplifies project management, allowing you to focus on what matters most - delivering exceptional results.
Forget about manual data collection and outdated systems. With Wingstar, you can collect data directly from your ground team, ensuring accuracy and timeliness in every update. Whether you're a project developer, EPC contractor, or consultant, Wingstar is your ultimate partner in project success.
Ready to take your project management to new heights? Elevate your game with Wingstar. Reach out to us today and experience the power of seamless collaboration and real-time insights. Your projects deserve the best - choose Wingstar and soar above the rest.
How do I create a project?
To create a project, follow these steps:
Step 1: From the sidebar, navigate to the "My Projects" tab.
Step 2: Click on the "Add New" button.
Step 3: A form will open. Fill in the required details of the project in the form.
Step 4: Save the form.
Step 5: You will be redirected to the project list page where you can see the newly added project.


How do I add a calendar?
To add a calendar, follow these steps:
Step 1: From the sidebar, go to "Settings" > "Project Configuration" > "Project Import".
Step 2: Click on the calendar widget.
Step 3: Click on the "Add New" button to proceed.
Step 4: Add a suitable title for the calendar you're creating.
Step 5: Define the working hours. You can add them in one go or split them into two parts: the hours before a break and the hours after the break. (Total should be 8 hours )
Step 6: Choose the working days by selecting the specific days of the week you'll be working.
Step 7: Save the information.
Now you should be able to see the newly added calendar.
To add an exception or holiday to your Wingstar calendar, follow these steps:
Step 1: Click on the second button with search icon in the actions column.
Step 2: Select an exception or holiday.
Step 3: If you have selected a holiday, then add the title and start date. If you have selected an exception, add the title, start and end dates, working hours, and exception day.
Step 4: Once you have completed the necessary details, submit the information.
Now you should be able to view the newly added exception in your calendar.


How do I create phases?
To create phases, follow these steps:
Step 1: From the sidebar, go to "Settings" > "Project Configuration" > "Project Phase".
Step 2: Click on the "Add New" button.
Step 3: Select the phase and the alias.
Step 4: Save it.
You will be redirected to the project phase page where you can see the newly added phase.
If the phase that you want is not available in the global phase list, follow these additional steps:
Step 5: Click on the "Add New" button.
Step 6: Select a new phase from the list.
Step 7: Fill in the details of the new phase.
Step 8: Save it.
You will be redirected to the project phase page where you can see the newly added phase.


How do I create project identifiers?
To create project identifiers, follow these steps:
Step 1: From the sidebar, go to "Settings" > "Project Configuration" > "Project Identifiers".
Step 2: Click on the "Add New" button.
Step 3: Select the phase and identifier.
Step 4: Save it.
If the identifier that you want is not available in the global identifier list, follow these additional steps:
Step 5: Select "Add New" in the identifier list.
Step 6: Fill in the details of the new identifier.
Step 7: Save it.
You will be redirected to the identifier page where you can see the newly added identifier.


How do I add a user?
To add a user, follow these steps:
Method 1: Using import user
Step 1: From the sidebar, go to "Settings" > "User Management".
Step 2: Click on the "Import User" button.
Step 3: Download the sample file.
Step 4: Fill in the user details according to the format provided in the file.
Step 5: Choose the file and upload it.
You can see the newly added user here.
Method 2: Using add new button
Step 1: Click on the "Add New" button.
Step 2: Fill in the details of the user.
Step 3: Save the information.
Here, you can see the newly added user.


How do I create a schedule?
To create a schedule, follow these steps:
Step 1: From the sidebar, go to "My Activities".
Step 2: Click on the button marked Plus.
Step 3: Fill in the required details, save them, and close the pop-up.
Here you can see the newly created activity. Similarly, we can create more activities.
If we want to create a child of an activity:
Step 1: Click on the plus button on that activity.
Step 2: Fill in the details, save them, and close the pop-up.
Now you can see that the child activity has been added. In the same way, we can create more child activities.
Here we can see the new child activity of the previous child activity.
Using the "Outdent" and "Indent" options:
The outdent is used to reposition a child activity, transforming it into a sibling of its parent activity. To use the outdent, select the child activity that you wish to move out and make it a sibling of its parent, then click the outdent button.
The indent is used to create a child for the sibling activity above it. Select the activity you intend to make a child of the sibling activity above, then click on the indent button.


How do I link activities?
To link activities, follow these methods:
Method 1: Using the Activity Tab
Step 1: From the sidebar, go to "My Activities".
Step 2: Double click on the activity that you want to link to another activity.
Step 3: Select "Predecessors".
Step 4: Select the activity to which you want to link the current activity, its type, and its slack, then submit and close the tab.
Step 5: On the Gantt menu, click on the "Auto Scheduling" button and the "Show Links" button to see the activities linked to each other.
Here you can see the activities are linked to each other.
Method 2: Using Gantt Chart
Step 1: Here we are going to use two options for zooming in and zooming out the Gantt chart.
Step 2: They are used for zooming in and zooming out the Gantt chart.
Step 3: Also, we can drag out the Gantt chart as shown in the video.
Step 4: When we hover on the activity, we can see a small circle appear at each end.
Step 5: So we can drag out that circle to link the current activity to the other activity.
Step 6: Here we can see activities linked.
Step 7: The same way, we can link all other activities.
Step 8: After linking all activities, click on the "Auto Scheduling" button.
Now you can see all activities are linked to each other.


How do I assign user, identifier, calendar, or vendor to an activity?
To assign user, identifier, calendar, or vendor to an activity, follow these methods:
Method 1:
Step 1: From the sidebar, go to "My Activities".
Step 2: Scroll through the activity chart.
Step 3: You will notice columns for user, identifier, calendar, and vendor.
Step 4: To assign a user, simply double click on the user column cell corresponding to the desired activity.
Step 5: A selection menu will appear allowing you to choose the appropriate user.
Step 6: After making the selection, press the Enter key. This action will assign the user to the activity.
Step 7: Similarly, you can add an identifier, calendar, or vendor using the same procedure.
Method 2:
Step 1: From the sidebar, go to "My Activities".
Step 2: Choose the activities to which you would like to assign users, identifiers, calendars, or vendors.
Step 3: Scroll through the activity chart where you'll find columns for user, identifier, calendar, and vendor.
Step 4: To assign a user to an activity, click on the "Assign Activity" button in the Gantt menu.
Step 5: Choose the module type (user) and specify the value by selecting the user you wish to assign to the activity.
Step 6: Click on the "Assign" button. You can now see that the user has been assigned to the selected activity.
Step 7: Similarly, you can add an identifier, vendor, or calendar by selecting the respective module from the "Assign Activity" menu and providing the appropriate value.


How do I add weight and distribute budgeted points?
To add weight and distribute budgeted points, follow these steps:
Step 1: On the "My Activities" page, scroll through the activity schedule.
Step 2: Locate the "Weight" and "Budgeted Points" columns.
Step 3: Understand that the weight of an activity corresponds to its contribution cost and duration. The greater the weight, the more important the activity.
Step 4: Double-click on the cell in the "Weight" column to add the weight for a particular activity.
Step 5: Click on the "Vertical Point Distribution" to add budgeted points.
Step 6: Add the budgeted points and click on "Distribute Points".
Step 7: Scroll through the activity schedule again to see the budgeted points distributed throughout all activities according to their weights.


How do I set a baseline?
To set a baseline, follow these steps:
Step 1: From the sidebar, navigate to "My Activities".
Step 2: Ensure that your schedule is properly created before adding the baseline to the project.
Step 3: Click on the "Set Baseline" button.
Step 4: A pop-up window will appear with two sections: one for adding the baseline and the other for switching between baselines. Note that you can create a maximum of three baselines for a project.
Step 5: Select a baseline from the list and choose whether to apply it to the whole schedule or selected activities.
Step 6: Save your selection. The baseline will now be added to your project.
Step 7: To view a different baseline, click on the "Set Baseline" button again, select the desired baseline, and submit your choice.
Step 8: You have now switched to the selected baseline. However, if the selected baseline has not been added to the project, it will not be visible.


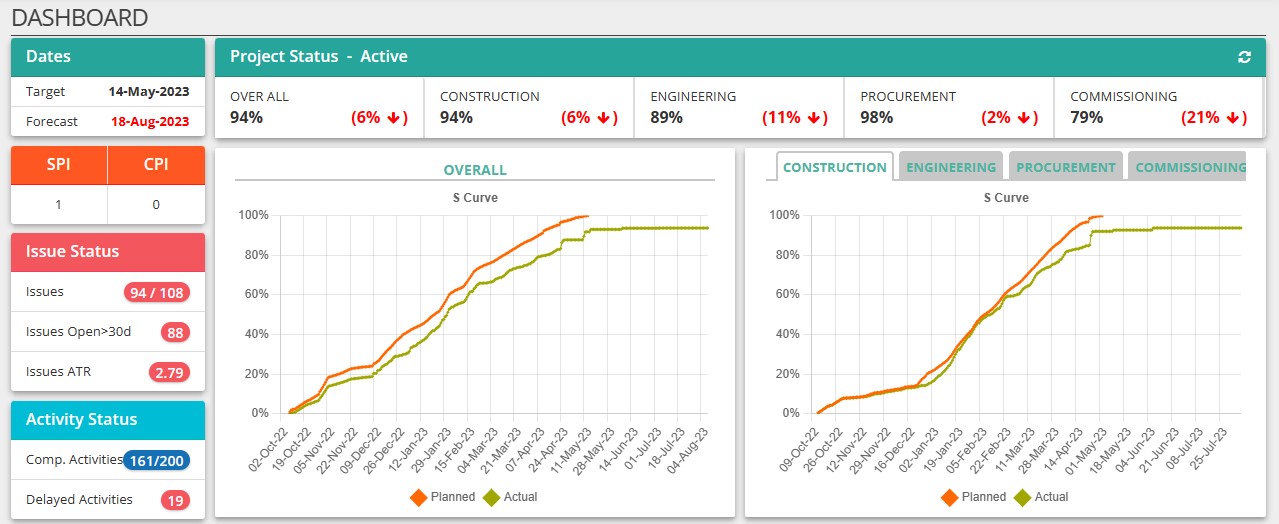
How do I configure the dashboard?
To configure the dashboard, follow these steps:
Step 1: Go to "Settings" > "Dashboard Configuration".
Step 2: In the "Widget and S-Curve Settings" section, select either WBS or phase to determine how your project's data will be organized and displayed on the dashboard. Choose the specific items you want to be shown.
Step 3: In the "Trend Chart" section, choose the items you want to include in the trend charts. These charts provide a visual representation of the plan versus actual progress and performance of your project over time. Select the relevant items for tracking and analysis.
Step 4: After configuring your desired settings, click on the "Update" button to save the changes.
Step 5: To generate an S-curve, click on the "Generate S-Curve" button. This will produce an S-curve chart based on your selected settings and project data.
Step 6: Scroll down to observe the newly added widgets and their curves, as well as the trend charts providing insights into your project's trends and patterns.


How do I raise an issue?
To raise an issue, follow these methods:
Method 1: Through the Issue Tracker
Step 1: From the sidebar, go to "Issue Tracker".
Step 2: Click on the plus button.
Step 3: Fill in the required details.
Step 4: Submit them.
Step 5: You will be redirected to the issue tracker page. Here, you can see the newly added issue.
Method 2: Through "My Activities"
Step 1: From the sidebar, go to "My Activities".
Step 2: Double-click on the activity to which you want to add an issue.
Step 3: Select the "Ratio" tab.
Step 4: Fill in the required issue details and submit them.
Step 5: Close the pop-up.
Step 6: Now, go to the issue tracker. Here, you can see the newly added issue.


How do I modify activity ID?
To modify activity ID, follow these methods:
Method 1: Changing a Single Activity ID
Step 1: On the "My Activities" page, double-click on the specific ID cell you wish to modify.
Step 2: Enter the new ID and then click the Enter button.
Step 3: You will notice that the activity ID has been successfully changed.
Method 2: Changing the Activity ID Series
Step 1: Go to "Settings" > "General Settings".
Step 2: Modify the activity code according to your preferences and save the changes.
Step 3: Once you return to the "My Activities" page and add new activities, you will see that the new activity series has been initiated.
Method 3: Changing the Activity ID Based on WBS
Step 1: Go to "Settings" > "Project Configuration" > "Project Import".
Step 2: Within the project import section, click on the activity ID widget.
Step 3: Select the WBS to which you want to apply the activity ID changes and modify the activity code according to your preferences.
Step 4: Once you submit the changes, you can return to the "My Activities" page and observe that the activity ID for the selected WBS has been successfully changed.


How do I create project areas and add project photos?
To create project areas and add project photos, follow these steps:
Step 1: From the sidebar, go to "Settings" > "Project Configuration" > "Project Areas".
Step 2: Click on the "Add New" button.
Step 3: A form will open, fill in the required details, and submit it.
Step 4: You can see here the newly added project area.
Step 5: Then, from the sidebar, go to "Photos".
Step 6: Click on the plus button.
Step 7: Select the area and upload the photo.
Step 8: Go to the project photo page.
Step 9: Here you can see the newly added photo.


How do I add a vendor?
To add a new vendor, follow these steps:
Step 1: Go to "Settings" > "Project Configuration" > "Master Module" > "Vendor".
Step 2: Click on the "Add New" button.
Step 3: Provide all the necessary details as required.
Step 4: After filling in the information, save the data.
Step 5: You will be automatically redirected to the identifier page where you can review and find the recently added vendor entry.


Know your Gantt chart.
On the "My Activities" page, various Gantt menu options and their uses are available. Let's discuss them:
1. Collapse and Expand:
- Collapse: Collapses all activities.
- Expand: Allows you to expand either all activities or
specifically selected ones.
2. Undo and Redo:
- Undo: Reverts the last action performed, effectively removing
its effects.
- Redo: Reverses the undo action and restores the previous
state.
3. Outdent and Indent:
- Outdent: Detaches a child activity from its parent, converting
it into a sibling to its parent.
- Indent: Converts a selected sibling into a child of the
sibling above it, modifying its hierarchical position.
4. Zoom Options:
- Zoom In: Enlarges the Gantt chart.
- Zoom Out: Reduces the magnification of the Gantt chart.
- Zoom to Fit: Adjusts the view to display the entire chart
within the available space.
5. Auto Schedule:
- Automatically generates a schedule based on activity
dependencies and constraints.
6. Critical Path:
- Highlights the critical paths in the schedule, indicating
activities directly impacting the project's overall timeline.
7. Full Screen:
- Allows viewing the schedule in full-screen mode, maximizing
the display area.
8. Show Links, Baseline, Slack, Progress, Text, and Gantt
View:
- Show Links: Reveals connections or dependencies between
activities, visually illustrating relationships.
- Show Baseline: Displays or hides the baseline of the schedule
or project, serving as a reference point for comparing actual
progress.
- Show Slack: Displays the amount of time a task can be delayed
without causing an impact on subsequent tasks or project
completion.
- Show Progress: Visually represents the progress of each
activity on the Gantt chart.
- Show Text: Controls the visibility of activity text in the
Gantt chart.
- Gantt View: Toggles the display of the Gantt chart.
9. Set Baseline, Show Columns, Sign Activity, Vertical Point
Distribution:
- Set Baseline: Establishes or displays a baseline for comparing
planned and actual progress.
- Show Columns: Allows displaying or hiding specific columns in
the schedule view and customizing their order.
- Sign Activity: Enables the assignment of users, identifiers,
calendars, or vendors to specific activities.
- Vertical Point Distribution: Facilitates the distribution of
budgeted points among activities.
10. Export Options:
- Export PDF: Exports the schedule in PDF format.
- Export Excel: Exports the schedule in Excel format.
11. Save as Template, View Level, and Project Info:
- Save as Template: Saves the current schedule as a template for
future projects.
- View Level: Displays activities based on their hierarchical
levels, showing them in accordance with their parent-child
relationships.
- Project Info: Provides access to project details for viewing
and management.
These options offer comprehensive control and customization over the schedule view and management within the project.

How do I import project and update historical data?
To import project files and update historical data, follow these steps:
1. Microsoft Project Import:
- Go to "Settings" > "Project Configuration" > "Project
Import".
- Click on the Microsoft Project widget.
- Ensure that mandatory fields in the file are filled
correctly.
- Choose the XML format file for compatibility.
- Select the file and upload it.
2. Primavera Import:
- Similarly, for Primavera project files, use the Primavera
import widget.
- Ensure the file is in XML format.
- Upload the file to complete the import process.
3. Updating Historical Data:
- Click on the historical update widget.
- Download the sample file for reference.
- Fill in the historical data details in the correct format.
- Upload the filled file to submit the updated historical data
successfully.
Ensure that all required fields are correctly filled and the file formats are compatible for a successful import and update process.

Pre-requisites for generating S-curve
To generate an S-curve, certain prerequisites must be met. These steps are outlined as follows:
Step 1: Project Schedule
- It is essential to create a comprehensive schedule for the project. This schedule should outline the sequence of activities and their respective durations, dependencies, and start/end dates.
Step 2: Activity Linking
- Once the schedule is established, activities within the project need to be linked to one another based on specific dependencies and requirements. This ensures that the project progresses smoothly and according to plan.
Step 3: Weight Allocation
- Assigning weights to Work Breakdown Structure (WBS) elements and individual activities is crucial. These weights are determined based on factors such as time, cost, and importance. Proper weight allocation helps prioritize tasks and resources effectively.
Step 4: Vertical Point Distribution
- After assigning weights to activities, budgeted points need to be distributed vertically across all activities based on their assigned weights. This distribution ensures that resources are allocated efficiently and in alignment with project objectives.
These steps serve as necessary preparations before creating the S-curve. For more detailed instructions on generating S-curves, please refer to the video provided. It will offer additional insights and guidance on the process.

Pre-requisites for trend charts
To generate trend charts, certain prerequisites must be fulfilled. These steps are outlined as follows:
Step 1: Quantity Allocation
- It is crucial to allocate scope for each activity within the project. This ensures that the workload is properly distributed and accounted for. If necessary, scope allocation can be revised even after the schedule is created to accommodate changes or adjustments.
Step 2: Update Planner
- The second step involves updating the project planner. This includes distributing the remaining workload across the available working days, effectively balancing the workload to ensure optimal resource utilization and project progress.
These steps serve as necessary preparations before creating the trend charts. For more detailed instructions on creating trend charts, please refer to the video provided. It will offer additional insights and guidance on the process.

How do I add work done and historical update to an activity?
To update the work done for activities in the project, follow these steps:
Step 1: Locate Activity
- Go to the "My Activities" section from the sidebar and find the desired activity. Double-click on it to open a pop-up window.
Step 2: Input Actual Start Date and Work Done
- In the pop-up window, input the actual start date and the amount of work done for the activity.
Step 3: Submit Updates
- After entering the required information, submit the updates and close the pop-up. The schedule will automatically adjust based on the new data.
Step 4: Modify Work Done Value
- Scroll through the activity chart until you find the "Work Done" column. Double-click on the corresponding cell to make changes directly to the work done value.
Step 5: Confirm Changes
- After making the necessary adjustments, press the "Enter" button to confirm the changes.
To update the historical progress for the past three days, follow these additional steps:
Step 1: Modify Activity
- Double-click on the activity you wish to modify. You can view the completion status here.
Step 2: Update Historical Progress
- Click on the "Historical Update" tab and input the work accomplished during the last three days.
Step 3: Save Changes
- Once you have entered the relevant information, click on the "Save" button to save your changes.
Step 4: Update Activity Status
- Click on the "Activity Status" tab, then click on the "Save" button followed by the "Close" button.
Now, when you double-click on the activity again, you will notice that the completion status has been updated accordingly.


How do I add task, reminder, or event?
To set reminders, tasks, and events on the dashboard page, follow these steps:
Step 1: Scroll Down to Calendar Section
- On the dashboard page, simply scroll down until you reach the calendar section.
Step 2: Click on Plus Button
- Within the calendar section, locate the plus button and click on it. This will open a pop-up window.
Step 3: Set Reminders and Tasks
- To add a task, select the "Task" option within the pop-up. Fill in necessary details such as title, deadline, start time, end time, responsible person, accountable person, and informed person. After completing the required information, save it to add the task.
- To add a reminder instead, click on "Notify" and input the number of days. Choose the parameter "before" or "after" from the provided list. Finally, save the reminder.
Step 4: View Added Items
- Once you have submitted the task or reminder, you will be able to see the newly added item in the calendar section.
Step 5: Add Events
- To add an event, click on the plus button and select the "Event" option within the pop-up. Enter the title, start date, and end date of the event.
- After saving the information, you will see the newly added event displayed in the calendar.
Please note that events are visible to everyone, while reminders and tasks can be personalized by individual users.


How do I create and use the template?
To create a template for the current project schedule and use it for future projects, follow these steps:
Step 1: Go to My Activities
- From the sidebar, navigate to the "My Activities" section.
Step 2: Save as Template
- In the "My Activities" page, locate the "Save as Template" button. Click on this button to save the current project schedule as a template for future use.
Step 3: Use the Template in Another Project
- Navigate to the project list and select the desired project
where you want to use the template.
- Go to "Settings" > "Project Configuration" > "Project Import".
- Click on the "Template" widget to access the templates. Choose
the specific template you want to use and click on the "Import"
button to import the template into the current project.
Step 4: Return to My Activities
- After completing the above steps, return to the "My Activities" page. You will notice that the project schedule has been successfully created using the selected template from the previous project.


How do I configure and generate DPR?
To configure and generate DPR, follow these steps:
Step 1: Go to Report Configuration
- From the sidebar, navigate to "Settings" > "Report Configuration".
Step 2: Add New Report
- Click on the "Add New" button to create a new report
configuration.
- Provide a title for the report and choose the desired project
phases and WBS.
Step 3: Submit Configuration
- After selecting the project phases and WBS, click on the "Submit" button to save the report configuration. You will now see the newly added report configuration.
Step 4: Access the Configured Report
- To access the configured report, navigate to the "Reports"
section in the sidebar.
- Click on the "DPR" widget and select the desired report from
the list.
Step 5: View and Download the Report
- Once you select the report, you will be able to view the
generated report.
- If you wish to download the report, simply click on the
"Export Report" button to download it in the desired format.


How do I generate a custom report?
To generate a custom report, follow these steps:
Step 1: Navigate to the Report Page
- From the sidebar, go to the report page.
Step 2: Select Custom Report Widget
- Find the custom report widget on the page and click on it.
Step 3: Choose Report Parameters
- Select the desired report type, identifier, and duration according to your preferences. These parameters will determine the content and scope of the report.
Step 4: Submit Parameters
- After selecting the desired parameters, submit them. The system will then generate the report based on the specified criteria.
Step 5: View Generated Report
- Once the report is generated, it will be displayed on the screen. Review the report to ensure it meets your requirements.
Step 6: Download the Report
- To download the report, simply click on the "Export" button. This will allow you to download the report in the desired format, such as PDF or Excel.


How do I generate a delayed activities report?
To generate a delayed activities report, follow these steps:
Step 1: Navigate to the Report Page
- Go to the report page from the sidebar.
Step 2: Select Delayed Activities Widget
- Locate the "Delayed Activities" widget on the page and click on it.
Step 3: Choose Phase and WBS
- Select the desired project phase and Work Breakdown Structure (WBS) from the available options.
Step 4: Initiate Search
- After selecting the phase and WBS, click on the "Search" button to initiate the search for delayed activities based on the specified criteria.
Step 5: View Generated Report
- Once the search is completed, the generated report showing delayed activities will be displayed on the screen. Review the report to identify and analyze the delayed activities.
Step 6: Download the Report
- To download the report, simply click on the "Export" button. This will allow you to download the report in the desired format for further analysis and distribution.


How do I generate the look ahead report?
To generate the look ahead report, follow these steps:
Step 1: Navigate to the Reports Page
- Go to the reports page from the sidebar.
Step 2: Select Look Ahead Report Widget
- Locate the "Look Ahead Report" widget on the page and click on it.
Step 3: Choose Report Parameters
- Select the desired dates, user, duration, and Work Breakdown Structure (WBS) according to your preferences. These parameters will determine the content of the report.
Step 4: Submit Parameters
- After selecting the desired parameters, submit them by clicking on the appropriate button (e.g., "Submit" or "Generate").
Step 5: View Generated Report
- Once the report is generated, it will be displayed on the screen. Review the report to gain insights into future activities based on the selected parameters.
Step 6: Download the Report
- To download the report, locate and click on the "Export" button. This will allow you to download the report in a downloadable format such as PDF or Excel.


Managing Activities in the Project
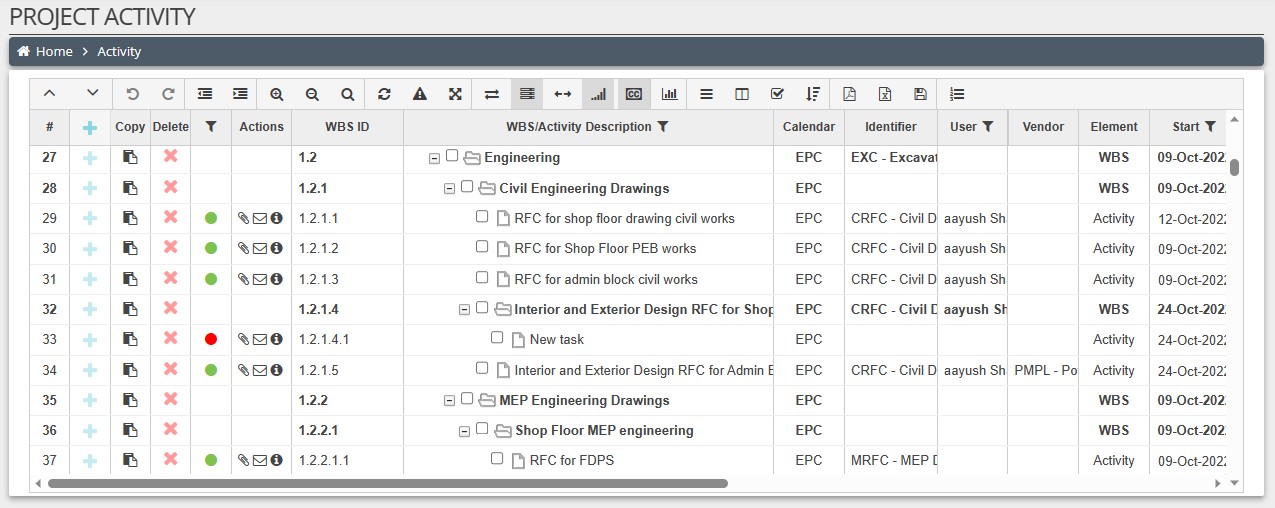
Creating an Activity:
Step 1: Navigate to "My Activities" Page
- Access the "My Activities" page. Use the arrow keys to navigate the selection.
Step 2: Enter Activity Details
- Enter the name of the activity or WBS.
Step 3: Add Activity
- Press the Enter key to add the activity.
Step 4: Continue Adding
- The newly added activity will be displayed, and you can continue adding more activities.
Creating a Copy of an Activity or WBS:
- Click on the designated button for the activity or WBS that you want to copy.
- A copy of the activity or WBS will be created as the next sibling to the original.
Indenting and Outdenting Activities:
- To indent an activity, navigate to that activity and press Shift + Right Arrow key.
- The activity will be indented, indicating its hierarchy within the project structure.
- To outdent an activity, navigate to that activity and press Shift + Left Arrow key.
- Note that the outdented activity will be moved to the last position in the tree structure.
Deleting an Activity or WBS:
- Click on the designated button for the activity or WBS to delete it.
Viewing Project Information:
- Click on the "Project Info" tab to access the details of the project schedule.
- Here, you can find relevant information related to the project schedule.

How do I configure the Design Change Note settings?
To configure the Design Change Note settings, follow these steps:
Step 1: Configure the Design Note Settings
- Navigate to the DCN Settings from the sidebar.
- In the "Reason of Change" section, you will find some predefined reasons for design changes. Select the reason that best fits your Design Change Note.
Step 2: Add a New Reason
- If a suitable reason does not exist, click on the "Add New" button.
- Enter the new reason name and click Save.
- The newly added reason will appear in the "Reason of Change" list.
Step 3: Configure the Approver Settings
- In the "Approver" section, add approvers in a unidirectional order.
- Click on the "Add New" button, enter the approver’s designation, select the appropriate user, and click Save.
- The newly added approver will appear in the approvers list.
- Important: Add approvers in the correct sequence. Do not add the final approver first, as this can disrupt the approval flow.
- Continue adding additional approvers by repeating the same steps as needed.


How do I manage a Design Change Note?
To manage a Design Change Note, follow these steps:
Step 1: Navigate to the Design Change Note Section
- From the sidebar menu, go to the Design Change Note section.
Step 2: Add a New Design Change Note
- Click on the "Add New" button.
- Fill in all the required details in the form fields and submit it.
- The newly created Design Change Note will appear in the list with its sequence of approvers.
Step 3: View Design Change Note Details
- Click on a specific Design Change Note number to view its details.
- You will have three options: Approve, Return, or Reject.
- Use the comment area to add relevant remarks related to your action.
- You can also download the PDF version of the note by clicking the PDF download icon.
Step 4: Actions on the Design Change Note
- Approved: The note moves to the next approver in the sequence.
- Returned: The note goes back to the previous approver for revision.
- Rejected: The note is marked as rejected and closed.

